

Embarking on a new flooring project can be exciting, but it’s fraught with potential pitfalls. To ensure a smooth process and a durable finish, it’s vital to be aware of common mistakes that installers often overlook. In this article, we will discuss some of these frequent blunders to help you achieve perfect flooring installation.
Investing in new flooring is not just about aesthetic appeal but also about making a long-term commitment to your space. The right flooring enhances your home’s functionality and adds value, making it essential to get it right from the start. Many homeowners dive headfirst into choosing colors and designs without considering the steps needed for a flawless installation. Remember that proper planning can significantly transform your experience and outcome.
Throughout this guide, you’ll learn that many mistakes stem from neglecting foundational elements, like the subfloor. This often leads to headaches later on when squeaking or warp begins to appear. Each oversight typically compounds into something much larger, affecting the overall durability of your flooring. By recognizing these common problems ahead of time, you’re already taking a step in the right direction toward a successful flooring installation.
In addition to planning your material choices wisely, taking the time to understand the specifics of the installation process is key. This knowledge will arm you with the confidence needed to tackle the project head-on, whether it’s a DIY endeavor or a professional job. Being proactive about moisture levels, acclimation times, and material requirements will pay dividends in the longevity and performance of your flooring.
Ultimately, the best flooring projects arise from a combination of accuracy, quality materials, and adherence to best practices. So, as you embark on this exciting journey, keep these mistakes in mind, and you’ll be well on your way to achieving a beautiful and robust flooring solution that stands the test of time. Remember, a little foresight can save you from a lot of future frustration, and you’ll enjoy your new floors for years to come.
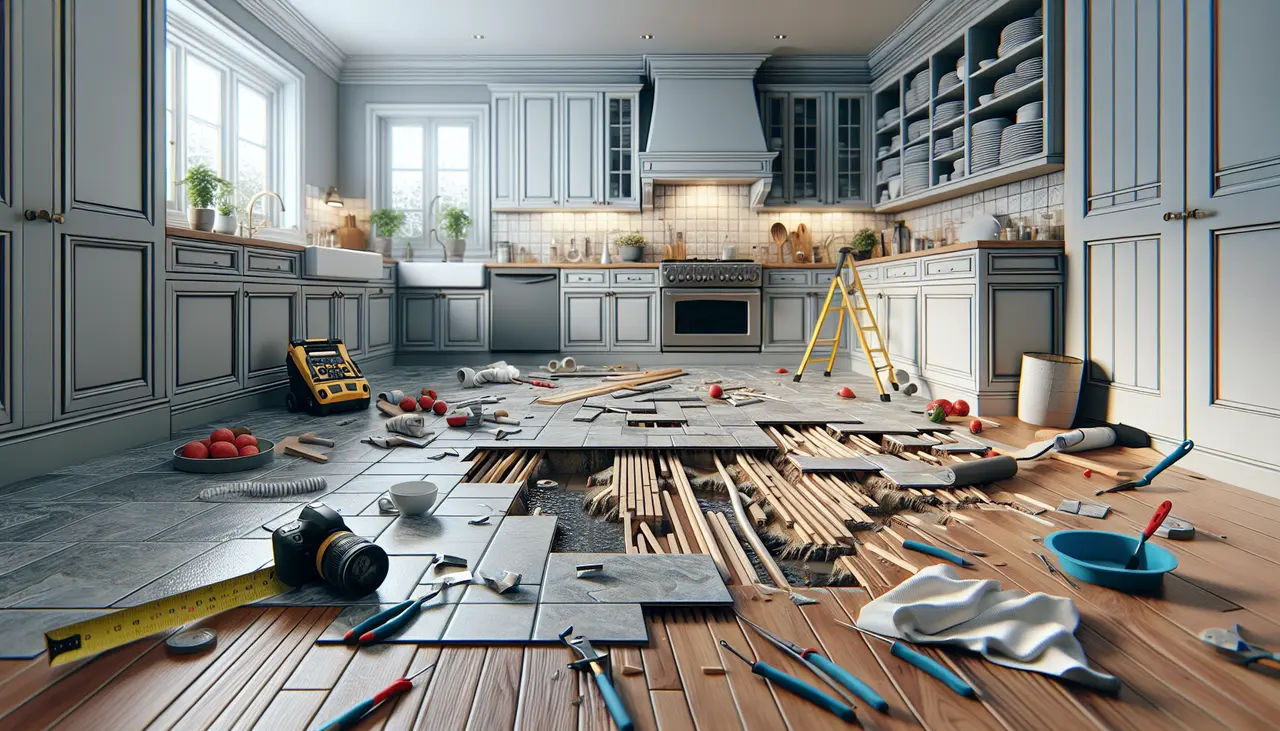
1. Ignoring the Importance of Subfloor Preparation
A subfloor in poor condition is a hidden saboteur in any new flooring installation. Many homeowners skip this crucial step, eager to see their new floor in place. However, without addressing the cleanliness, dryness, and levelness of the subfloor, you risk an uneven and unstable finish. As discussed in Common Mistakes to Avoid When Installing Flooring, improper subfloor preparation can lead to squeaks and cracks, shortening the lifespan of your investment. Take the time to thoroughly inspect and prepare your subfloor—your future self will thank you.
Subfloor issues can cause major headaches post-installation, often manifesting as mysterious floor movements or inexplicable noise. It’s vital to address any damage or wear on your subfloor system before proceeding. This step is particularly important when laying down materials that rely heavily on the subfloor for support, such as hardwood or tile floors. Assess each section of the subfloor for damage, using necessary tools to level and repair where needed. A meticulous approach to subfloor prep can prevent costly repairs later on and maintain the integrity of your flooring project.
2. Skipping Moisture Testing
Moisture can be a hidden challenge for flooring, leading to warping, buckling, or mold in damp spaces. It’s essential to test moisture levels in both subfloors and new materials, especially in humid rooms like basements or bathrooms. This step helps ensure durability and prevents premature failure. For comprehensive moisture solutions, explore Hardwood Floor Care on ElmWood Flooring’s site to enhance maintenance strategies and flooring longevity.
3. Underestimating Material Needs
Underestimating the amount of flooring material needed is a task fraught with hazards that can threaten the smooth progress of your project. A common oversight is not accounting for waste due to cuts and adjustments required during fitting. As seen in guidelines from Floorzz, always factor in a percentage buffer for unexpected mishaps—at least 10% over your calculated area. This foresight can eliminate frustrating delays and unplanned costs, allowing for a seamless installation process.
Running out of materials midway through an installation is an all-too-common scenario for those unaccustomed to flooring projects. This miscalculation not only stalls the project but can lead to issues with product availability, particularly if the flooring type or design is discontinued. Make sure to accurately measure the area and add additional material for miscuts and future repairs. By doing so, you can achieve a flawless finish without the chaos of mid-project halts and ensures consistency across the room.
4. Choosing the Wrong Type of Flooring for the Space
Choosing inappropriate flooring materials for specific rooms is a frequently costly error. Each room has its own environmental challenges that impact flooring longevity and look. A kitchen or bathroom, known for high moisture, would not favor hardwood without proper sealing. Similarly, heavy foot traffic demands robust materials like engineered wood or tile. For guidance on selecting the right flooring, the blog Common Mistakes to Avoid offers practical insights. Remember, the right choice not only enhances beauty but also ensures functionality.
5. Neglecting Acclimation Time
Flooring materials need time to adapt to their new home environment. This adaptation, known as acclimation, helps prevent issues like gaps or buckling caused by temperature and humidity changes. As emphasized by Flooring Installation Troubleshooting, it’s vital to allow your flooring materials to sit in the installation area for at least 48 to 72 hours prior to laying them down. This time frame helps maintain the material’s integrity and fit, leading to a flawless finish.
6. Incorrect Use of Adhesives
Adhesives play a foundational role in secure flooring installations, but incorrect application can lead to long-term failure. Using the wrong type or quantity can result in poor bonding, resulting in floor shifting or peeling. Always follow manufacturer instructions to the letter—proper adhesive procedures differ significantly between materials like vinyl and engineered wood. This detail is highlighted in discussions on ensuring a flawless finish by Design Center East. Proper application yields stable, visually pleasing floors that hold up under pressure.
7. Ignoring Expansion Gaps
Expansion gaps are critical in preventing floor buckling or cracking as materials naturally expand and contract with temperature changes. You must respect these invisible boundaries to allow for necessary movement, as highlighted in Flooring Installation Issues. Use recommended spacers and follow guidelines for edge gaps to maintain a stable installation. Overlooking this principle could compromise your flooring’s structural integrity, leading to costly interventions down the line.
8. Mismatched Patterns or Colors
Starting a flooring project without a clear vision can lead to mismatched patterns or colors—an oversight that diminishes your room’s aesthetic. Visual harmony requires thoughtful planning and layout before cutting or installing. As suggested in insights from Common Mistakes When Installing New Flooring, lay out your patterns beforehand to ensure consistency and avoid abrupt transitions. This saves time and frustration, ensuring that each plank or tile complements the overall design narrative.
9. Improper Cutting Techniques
Precision is key when cutting flooring materials, as poor techniques can lead to gaps, jagged edges, and an unprofessional look. Ensure you have the right tools and are familiar with their operation. Careful measurement and cutting are imperative to maintaining a polished finish, as detailed in Common Mistakes to Avoid. This attention to detail ensures that each piece fits snugly against the next, enhancing both the beauty and function of your flooring.
Cutting flooring materials is a nuanced task requiring skill and the correct tools. Inadequate cutting not only detracts from a room’s appearance but can also impede the material’s performance. Invest the time to understand different techniques for various materials such as hardwood, laminate, and tile, each having unique cutting requirements. Matching your cutting approach with the correct tool, as recommended by flooring experts, assures clean lines and an impeccable finish, crucial in achieving an installation that looks professionally done.
10. Overlooking Maintenance Requirements
The longevity of your flooring is often decided long after installation, with maintenance playing a pivotal role. Different materials call for varying upkeep strategies, whether it’s regular polishing for hardwood or special cleaning agents for tiles. Understanding these distinct requirements preserves your floor’s integrity and appearance, ensuring it remains a centerpiece of your home. As noted by experts in the sector, integrating these maintenance routines into your weekly cleaning can prevent wear and tear, and retain your flooring’s allure for many years.
11. Failing to Consult Professionals When Needed
While DIY endeavors can be rewarding, there are times when consulting professionals is crucial. Complex installations may pose challenges that require expert intervention to prevent costly mistakes. Professionals bring experience and insight that can save you time and resources. Engaging a reputable flooring professional not only provides peace of mind but also ensures the finished product meets your expectations. As flooring installation issues outlined by Wagner Meters demonstrate, professional help is invaluable.
12. Ignoring Safety Precautions
A safe work environment is crucial for any flooring project. Overlooking safety measures like wearing goggles, masks, and earplugs can result in preventable injuries that could easily sidetrack your flooring installation. It’s essential to recognize that, while flooring may seem straightforward, the tools and materials involved can be hazardous if mishandled. Understanding specific guidelines for different flooring materials not only enhances safety but also ensures that your workflow remains efficient throughout the project.
Prioritizing safety guarantees an installation that’s not only visually appealing but also injury-free. Taking the time to prepare your workspace—removing obstacles, ensuring proper ventilation, and maintaining a tidy work area—can further minimize risks. By incorporating safety protocols into your flooring project, you’re not just protecting yourself; you’re also setting a solid foundation for a successful outcome. A thorough approach to safety enhances both the project’s success and enjoyment, allowing you to focus on creating a beautiful, durable finish that you’ll cherish for years to come. Remember, a little caution now means a lot less hassle later, both for you and your newly installed floors.

